📄 Introduction
Until now, your Rust journey has been mostly logical — write code, run it, and see results in a black-and-white terminal.
That’s powerful. But let’s be honest… it’s not very visual.
In this post, you’ll build your first native GUI (Graphical User Interface) app in Rust — something you can see, interact with, and use without touching the terminal.
What if your Rust programs had buttons, forms, and live feedback — like real desktop apps?
🤝 Meet the Student Analyzer — a clean, minimal form where you can:
- Enter student name, roll number, and marks
- Instantly see calculated results like average and pass/fail
- Clear and refill the form with ease
- Save everything to a
.csvfile for future use
We’ll use the sleek combo of egui + eframe — Rust-native libraries to build fast desktop GUIs without the need for a browser or backend.
But what exactly are egui and eframe?
- egui – a simple and fast immediate-mode GUI library for Rust that handles drawing, layout, and UI components like buttons, text fields, and sliders.
- eframe – a framework built on top of egui that makes it easier to create full applications with a window, event loop, and persistent state.
Together, they let us build lightweight, cross-platform desktop apps — all in pure Rust, without needing HTML or JavaScript.
🔎 What You’ll Learn
This project is perfect if you want to:
- Reinforce Rust concepts like structs, enums, and user input
- Learn how to build interactive GUI apps beyond terminal output
- Understand event-driven updates and simple CSV file handling
📌 Missed the Foundations of Rust?
Catch up with these essential posts before diving into GUI:
“Building a Rust GUI app might sound intimidating — but with Cargo and a couple of powerful crates, it’s smoother than you think!”
Ready to bring your Rust code to life on the screen? Let’s dive in and build the Student Analyzer step by step.
📁 Project Folder Setup
Let’s create a clean workspace for our GUI app using Cargo — Rust’s official project manager.
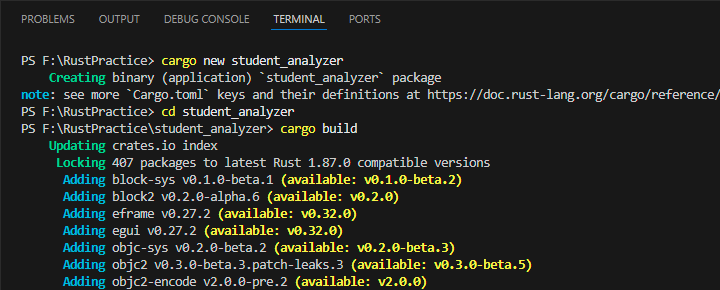
1️⃣ Step 1: Create the Project
In your terminal or command prompt, run:
cargo new student_analyzer
cd student_analyzer
Screenshot : Creating a new Rust project using Cargo

Click the image to view full size
2️⃣ Step 2: Add GUI dependencies
Open Cargo.toml and add:
eframe = "0.27"
egui = "0.27"
These two crates give us native GUI capabilities:
- eframe : Think of it as the “app runner” — it creates the native window and event loop.
- egui : This is where the magic happens — buttons, sliders, forms, and all the visuals live here.
Screenshot : Adding eframe and egui to enable GUI support in Rust
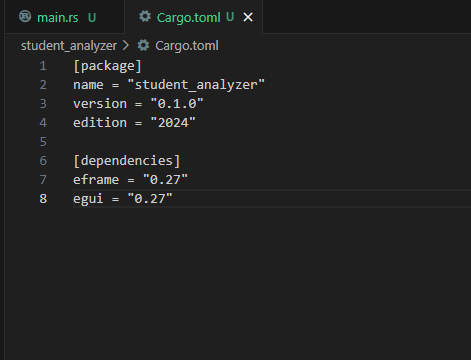
Click the image to view full size
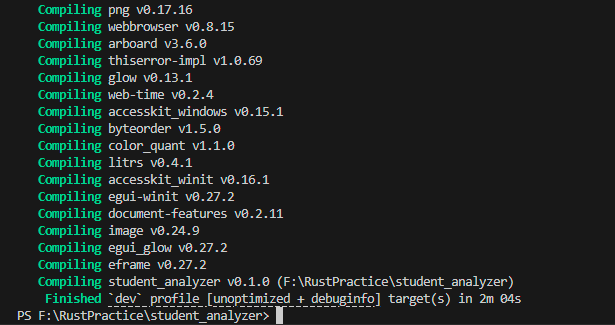
3️⃣ Step 3: Build once to fetch dependencies
Back in terminal:
cargo build
This will download and compile the GUI crates.
Screenshot : Building the project to fetch dependencies
Click the image to view full size
“Let the compiler do its thing — it might take a minute as it grabs ~162 dependencies. Perfect time to stretch or grab a cup of tea ☕!”
Click the image to view full size
Tip: The first build is the slowest — thanks to Rust’s strict compiling. Future builds will be much faster due to smart caching.
With the folder ready and GUI support in place, it’s time to bring our app to life. In the next section, we’ll write the full code for the Student Analyzer — and see it in action!
▶️ Your First Rust GUI App — In Action!
Before we walk through the code, let’s preview what the Student Analyzer app actually does — from typing student info to saving it as a file.
Here’s what you’ll experience:
- The full code in action
- A working GUI window with live input
- The generated data file saved locally
⏩ App Preview – What It Looks Like
💻 Full Code in VS Code
Screenshot : Complete main.rs code for the Student Analyzer GUI app using eframe and egui.
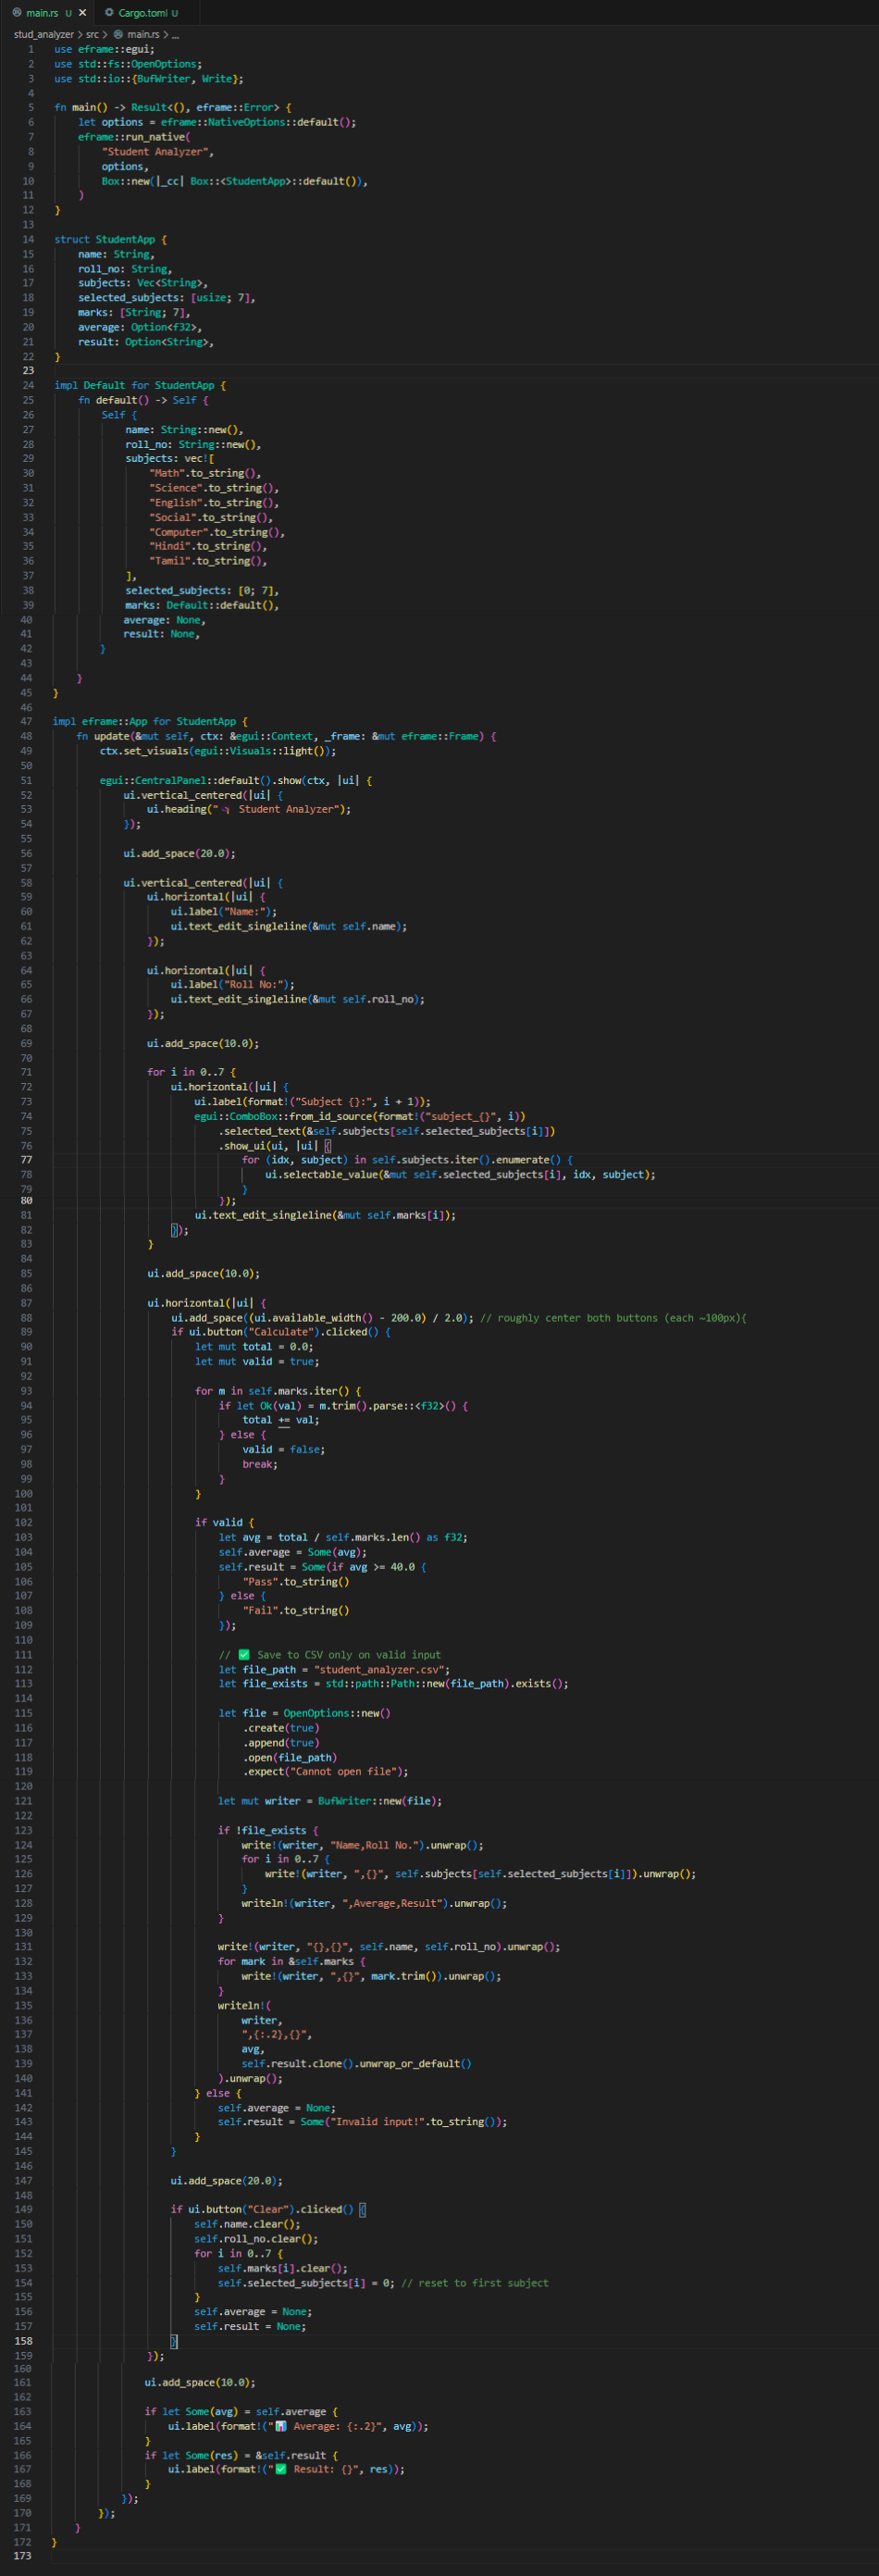
Click the image to view full size.
If it still appears small, click it once more to zoom in fully and view it clearly.
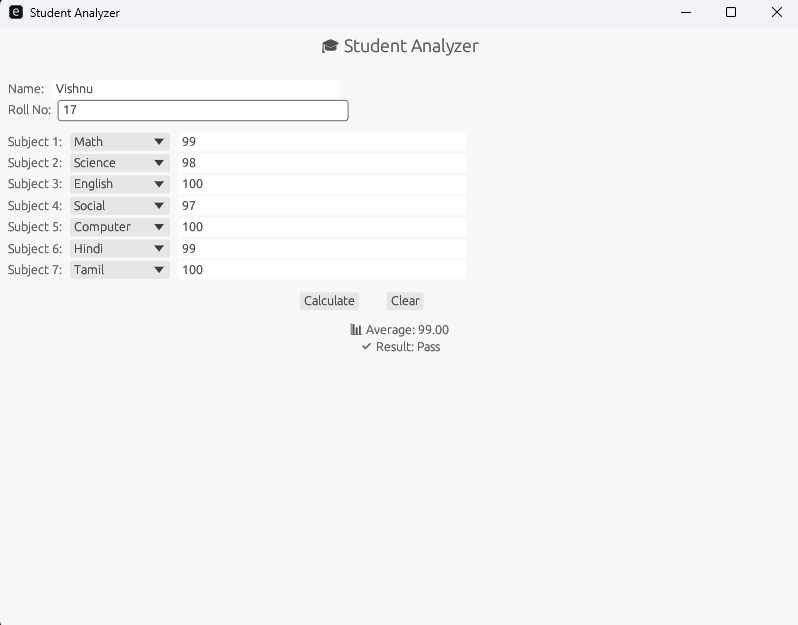
🖱️ Output Window – GUI App
Screenshot : The running Student Analyzer app — enter student info, save it, and clear with ease.
Click the image to view full size
🖨️ CSV/Text Output Preview
Screenshot : Student data saved to a text/CSV file locally from the app — perfect for later export or reports.

Click the image to view full size
📋 Full Code – Copy-Friendly
Below is the complete implementation — all in a single main.rs file.
It includes:
- UI layout using
egui - User input handling and real-time updates
- File-saving logic (CSV/text output)
Note : This code is lengthy, so for clean viewing and testing, download it here. You can open it in VS Code or Notepad or run it via cargo run.
Now that you’ve seen the Student Analyzer in action, it’s time to decode how it works — from main() to UI components and logic. We’ll go step-by-step.
🪜 Code Walkthrough — From Form to Function
Here’s how the whole app comes to life — piece by piece!
You’ve already seen what the app does. Now, let’s unpack how it works, starting from the header imports all the way down to UI and logic.
📥 Importing Essentials
These are the header files we use in the Student Analyzer GUI App
use eframe::egui;
use std::fs::OpenOptions;
use std::io::{BufWriter, Write};
Explanation :
These are the header files we use in the Student Analyzer GUI App:
eframe::egui– Brings in theeguitoolkit viaeframe, enabling GUI layout and interactivity.OpenOptions– Lets us create or append to a file without overwriting existing data.BufWriter– Buffers output for efficient file writing.Write– Trait required to use the.write_all()method and similar I/O functions.
🚀 The main Function – App Launcher
The main() function launches the GUI window and runs our app.
fn main() -> Result<(), eframe::Error> {
    let options = eframe::NativeOptions::default();
    eframe::run_native(
        "Student Analyzer",
        options,
        Box::new(|_cc| Box::<StudentApp>::default()),
    )
}
Explanation :
Let’s break down what happens here:
-
fn main() -> Result<(), eframe::Error>
Entry point of the app. If anything fails during GUI setup, an error is returned cleanly viaeframe::Error. -
let options = eframe::NativeOptions::default()
Prepares the native window settings — like size, resizability, decorations — using default values. eframe::run_native(...)
This function launches the GUI app. It takes:- A window title:
"Student Analyzer" - The native options we just defined
- A closure that creates an instance of
StudentAppusing its default implementation.
- A window title:
Box::new(|_cc| Box::<StudentApp>::default())
This is a factory closure. It receives a creation context (unused here, so_cc) and returns a boxed version of our app’s main struct.
🧱 Defining the StudentApp Struct
This struct defines the core data model for your GUI application — it stores all the necessary information about a student’s academic record, including name, roll number, subject selections, and marks.
| Field | Type — Why This Type? | Purpose |
|---|---|---|
name |
String — Names are variable-length text |
Student’s full name |
roll_no |
String — Roll numbers can include letters, dashes, or other characters |
Unique identifier like “CS101-22” |
subjects |
Vec<String> — Dynamic list that grows/shrinks as needed |
All available subjects |
selected_subjects |
[usize; 7] — Fixed-size array of indexes, matching the number of subjects to choose |
Points to 7 selected subjects |
marks |
[String; 7] — Raw text input per subject; allows empty or invalid entries to be handled gracefully before validation |
Stores mark entries (as strings) |
average |
Option<f32> — Starts as None, becomes Some(value) when average is computed |
Holds the average marks |
result |
Option<String> — Result is optional until processing is complete (e.g., “Pass” or “Fail”) |
Final computed result |
Now that we’ve defined what the app holds (via the struct) and how it launches (via main()), let’s explore how it should appear in first launch.
This is done by implementing the impl Default trait.
🕹️ Implementing the Default State - impl Default for StudentApp
To build any interactive GUI app in Rust using eframe, you need to define what the app should look like at launch — before the user interacts with it.
That’s where the Default trait comes in.
We implement the Default trait for our StudentApp struct to set up a clean starting point. Think of this as creating a blank student form with:
- Empty name and roll number fields
- A predefined list of subjects
- Empty mark inputs
- No result or average shown yet
❓ Why Do We Need a Default State?
When the app starts, eframe needs to know what the UI should display initially.
That’s exactly what the default() function returns — a fresh StudentApp instance with pre-filled and empty fields.
This instance is then passed here:
Box::new(|_cc| Box::<StudentApp>::default())
This line tells eframe:
“Here’s the initial state of the app — now go ahead and display it!”
⌨️ Code: Defining the Structure and Default State
Below is the full code for our StudentApp struct along with its Default implementation.
This sets up the initial state of the app when it first launches:
struct StudentApp{
    name: String,
    roll_no: String,
    subjects: Vec<String>,
    selected_subjects: [usize; 7],
    marks: [String; 7],
    average: Option<f32>,
    result: Option<String>,
}

impl Default for StudentApp {
    fn default() -> Self {
        Self {
            name: String::new(),
            roll_no: String::new(),
            subjects: vec![
                "Math".to_string(),
                "Science".to_string(),
                "English".to_string(),
                "Social".to_string(),
                "Computer".to_string(),
                "Hindi".to_string(),
                "Tamil".to_string(),
            ],
            selected_subjects: [0; 7],
            marks: Default::default(),
            average: None,
            result: None,
        }

    }
}
Note: This section only defines the app’s data model and initial state.
Screenshot : What the app window would look like right after launch, before entering any data or adding logic to handle it.
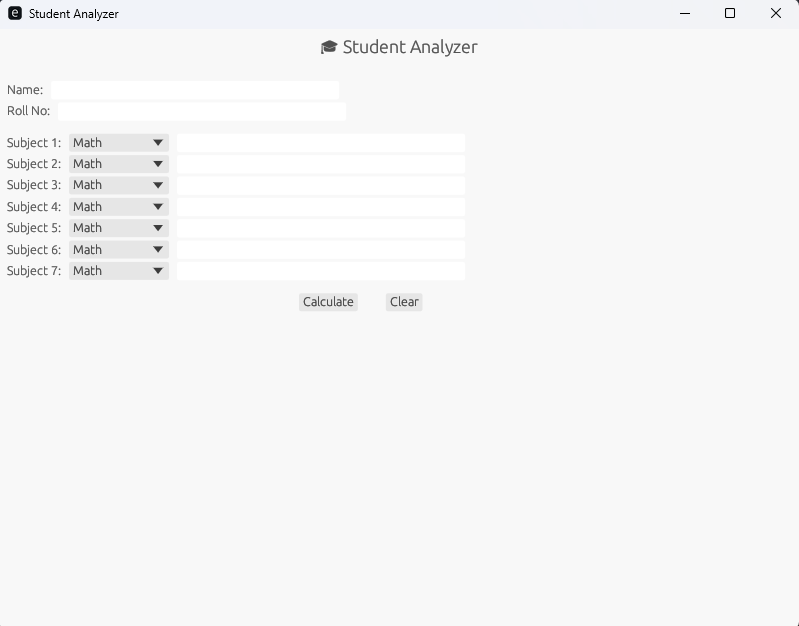
Click the image to view full size
Heads-up :
If you try running only this code (struct + impl Default), the app won’t compile or display anything yet.
GUI apps using eframe need a rendering engine — that’s done through the update() function (which we’ll add next), and an entry point via eframe::run_native() in main().
⚙️ Powering the App – impl eframe::App in Action
Now that we’ve defined what the app stores (struct) and how it starts (impl Default), it’s time to describe how it runs and reacts on screen
This is done using the impl eframe::App for StudentApp block.
This update() function is like the engine room of your GUI — it’s called every frame, handles inputs, redraws visuals, and updates your app’s logic.
❓ What update() Does
The update() gets called repeatedly while your app is running. Inside this function, we:
- Create a window (CentralPanel) where the UI lives.
- Add form fields for user input (like name, roll number, subjects, marks).
- Handle logic for computing average and result.
- Render the result to the user.
📝 Breakdown of Key Code Lines in update()
Here’s a quick overview of the key lines inside update() — what they do and why they matter:
| Code Block or Line | Purpose |
|---|---|
ctx.set_visuals(...) |
Sets the visual theme (light mode). |
egui::CentralPanel::default().show(...) |
Main layout container of the UI with title centered. |
ui.text_edit_singleline(...) |
Inputs for name and roll number. |
for i in 0..7 { ... } |
Loops through 7 subjects to render dropdown + mark field. |
egui::ComboBox::from_id_source(...) |
Renders subject dropdown for each entry. |
ui.button("Calculate").clicked() |
Logic to compute average and result. |
self.marks.iter(){...} |
Parses entered marks as numbers. |
self.average = Some(avg) |
Stores calculated average. |
self.result = Some(...) |
Displays “Pass” or “Fail” based on average. |
⌨️ Code: Building the Interface and Logic
Here’s the full code inside the update() method — the visual and logical core that powers your GUI every frame.
impl eframe::App for StudentApp {
    fn update(&mut self, ctx: &egui::Context, _frame: &mut eframe::Frame) {
        ctx.set_visuals(egui::Visuals::light());

        egui::CentralPanel::default().show(ctx, |ui| {
            ui.vertical_centered(|ui| {
                ui.heading("🎓 Student Analyzer");
            });

            ui.add_space(20.0);

            ui.vertical_centered(|ui| {
                ui.horizontal(|ui| {
                    ui.label("Name:");
                    ui.text_edit_singleline(&mut self.name);
                });

                ui.horizontal(|ui| {
                    ui.label("Roll No:");
                    ui.text_edit_singleline(&mut self.roll_no);
                });

                ui.add_space(10.0);

                for i in 0..7 {
                    ui.horizontal(|ui| {
                        ui.label(format!("Subject {}:", i + 1));
                        egui::ComboBox::from_id_source(format!("subject_{}", i))
                            .selected_text(&self.subjects[self.selected_subjects[i]])
                            .show_ui(ui, |ui| {
                                for (idx, subject) in self.subjects.iter().enumerate() {
                                    ui.selectable_value(&mut self.selected_subjects[i], idx, subject);
                                }
                            });
                        ui.text_edit_singleline(&mut self.marks[i]);
                    });
                }

                ui.add_space(10.0);

                ui.horizontal(|ui| {
                    ui.add_space((ui.available_width() - 200.0) / 2.0); // roughly center both buttons (each ~100px){
                    if ui.button("Calculate").clicked() {
                        let mut total = 0.0;
                        let mut valid = true;

                        for m in self.marks.iter() {
                            if let Ok(val) = m.trim().parse::<f32>() {
                                total += val;
                            } else {
                                valid = false;
                                break;
                            }
                        }

                        if valid {
                            let avg = total / self.marks.len() as f32;
                            self.average = Some(avg);
                            self.result = Some(if avg >= 40.0 {
                                "Pass".to_string()
                            } else {
                                "Fail".to_string()
                            });
// ----------------- CSV writing continues from next section -----------------
Together, the main(), struct, impl Default, and impl eframe::App blocks form the complete GUI flow of your Student Analyzer app.
Screenshot : After implementing update(), the GUI becomes interactive — users can enter student info, and the app calculates the average and shows the result instantly.
(Refer to the above egui_window image from App Preview section for this screenshot)
Note : While the heading and buttons are centered using vertical_centered and spacing, the text input fields appear left-aligned due to the default layout behavior of ui.horizontal(). We can fine-tune this in future versions using more flexible layout containers.
Now you’ve seen how the update() function drives the UI, processes user input, and renders output in real-time. From visual setup to form handling and result calculation — this is the core engine that powers your Student Analyzer app.
But what if you want to save student results for future reference? Or maybe clear the form to enter a new student?
Let’s add those finishing touches next…
📇 Saving Results to CSV and Clearing Inputs
This final step in your Student Analyzer GUI app adds two essential features:
- Saving results : It writes each student’s data (name, roll no., subjects, marks, average, result) into a CSV file. If the file doesn’t exist, it creates it and adds headers.
- Clearing inputs : It resets all form fields, allowing users to enter fresh data for the next student.
📝 CSV Save & Clear Logic – Key Highlights
Here’s a breakdown of what each part of the save-and-reset logic does in the app:
| Line/Block | Purpose |
|---|---|
let file_path = "student_analyzer.csv"; |
File location for saving data |
let file_exists = ... |
Check if file already exists to avoid duplicate headers |
OpenOptions::new()... |
Open or create the file in append mode |
let mut writer = BufWriter::new(file) |
Buffer the writing to improve performance |
if !file_exists { ... } |
Write CSV headers (Name, Roll No., Subjects…) if it’s a new file |
write!(writer, "{},{}", self.name, self.roll_no)... |
Write student’s info and marks to the CSV |
self.result.clone().unwrap_or_default() |
Safely fetch and write result |
self.average = None; self.result = Some("Invalid input!") |
Show error if marks input is invalid |
if ui.button("Clear").clicked() { ... } |
When clicked, clears all text fields and resets subjects |
ui.label(...) |
Show average and result on screen Pass or Fail or invalid input |
⌨️ Code: Save the Results in CSV and clear inputs
Now that we’ve calculated the average and result, let’s persist the data by saving each student’s entry into a CSV file for future use or reporting.
                            let file_path = "student_analyzer.csv";
                            let file_exists = std::path::Path::new(file_path).exists();

                            let file = OpenOptions::new()
                                .create(true)
                                .append(true)
                                .open(file_path)
                                .expect("Cannot open file");

                            let mut writer = BufWriter::new(file);

                            if !file_exists {
                                write!(writer, "Name,Roll No.").unwrap();
                                for i in 0..7 {
                                    write!(writer, ",{}", self.subjects[self.selected_subjects[i]]).unwrap();
                                }
                                writeln!(writer, ",Average,Result").unwrap();
                            }

                            write!(writer, "{},{}", self.name, self.roll_no).unwrap();
                            for mark in &self.marks {
                                write!(writer, ",{}", mark.trim()).unwrap();
                            }
                            writeln!(
                                writer,
                                ",{:.2},{}",
                                avg,
                                self.result.clone().unwrap_or_default()
                            ).unwrap();
                        } else {
                            self.average = None;
                            self.result = Some("Invalid input!".to_string());
                        }
                  });
            });
      }
}
Screenshot : Once the average and result are calculated, the data is written to a .csv file. To view it, right-click student_analyzer.csv from the Rust project folder → Open with MS Excel.
(Refer to the above csv_file image from the App Preview section for this screenshot.)
📜 Conclusion - You Just Built a Complete GUI App in Rust!
🎉Congratulations! You’ve just completed a fully interactive Student Analyzer GUI app in Rust using eframe and egui.
- Structure your app with struct and impl
- Capture and validate user input
- Calculate average and result dynamically
- Save data into a .csv file
- Reset the form with a “Clear” button
- Render real-time output in a modern, clean interface
🔜 Next on Techn0tz🚀
Before we dive into deeper Rust concepts like ownership, borrowing, and lifetimes, let’s hit pause and reflect.
You’ve come a long way — from variables and mutability to loops and functions. It’s time to test your Rust foundations with a quick interactive Mini Quiz. This quiz is to test and reinforce everything you’ve learned so far: variable, mutability, control flow, functions and more
Stay tuned on Techn0tz🚀 — your Rust journey is about to get even more exciting!