📄 Introduction
In Rust, even variables have rules — but they make you a better coder.
It doesn’t just run fast — Rust helps you write safer, smarter code from the start. This post gets you hands-on with the syntax that makes it powerful, reliable, and surprisingly enjoyable.
More than just another language, Rust is a mindset. Designed with safety, performance, and clarity at its core, it demands precision from the very first line — and that’s a good thing.
Before we dive into topics like ownership and lifetimes in later posts, it’s important to first get comfortable with the foundations — how variables behave, how values can change (or not), and how Rust enforces safety right from the basics.
In this post, we’ll explore the core building blocks of Rust: variables, shadowing, and data types. No heavy theory — just clean examples and practical explanations to help you understand why things work the way they do.
Whether you’re coming from Python, JavaScript, or starting fresh, these examples will help you build confidence — and start writing smarter, safer Rust code right away.
From the Previous Post
We’re continue in the same RustPractice folder used in Hello Rust Setup and now we’ll create new projects to walk through variables the Rust way.
📑 Variables and Mutability
📁 Create a new project to explore variables
Let’s create a fresh project just for practicing variables and mutability:
cargo new variable_eg
cd variable_eg
This creates a new folder with a basic Rust project and a starter main.rs file under src. We’ll use this file to explore how Rust handles variables, user input, and mutability step by step.
Screenshot : A new Rust project named variable_eg has been successfully created.
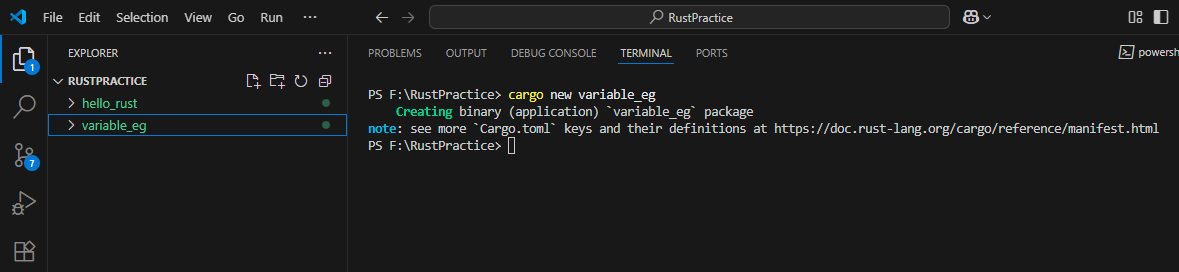
Click the image to view full size
⁉️ Why Variables Matter in Rust
Rust does things differently — and one of the first things you’ll notice is:
Variables are immutable by default.
That means once you assign a value to a variable, you cannot change it, unless you explicitly mark it as mutable using the mut keyword.
This may seem restrictive at first, especially if you’re coming from languages like Python or JavaScript. But it brings some big advantages:
- Fewer bugs: Rust helps catch changes you didn’t mean to make.
- Cleaner logic: Encourages you to think clearly about data flow.
- Safe code by design: Immutability helps maintain stability and thread safety.
You’ll soon see how Rust makes you think carefully about what can change — and that’s part of what makes Rust so reliable.
🔖 Keywords & Concepts in this program
Here’s a quick breakdown of the key Rust elements used in this program:
| Line | Concept |
|---|---|
use std::io |
Importing the standard input module |
let mut name = String::new() |
Declaring a mutable string variable |
read_line() |
Reading input from user via terminal |
expect() |
Handling potential input errors |
trim() |
Removing newline from input string |
println!() |
Printing formatted output using placeholders |
Example Program: Greet the User!
Let’s write a simple program that asks for your name and greets you personally.
Screenshot : main.rs with code for greeting the user
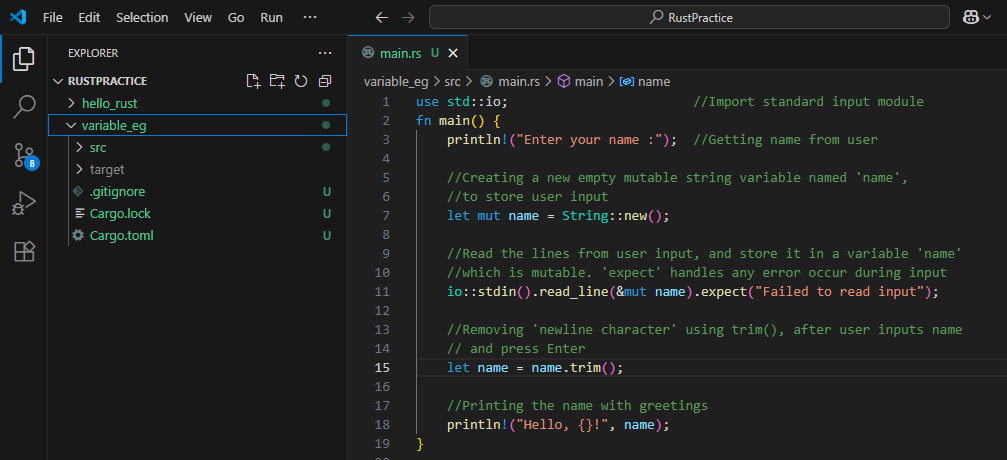
Click the image to view full size
Screenshot : VS code terminal for greeting the user
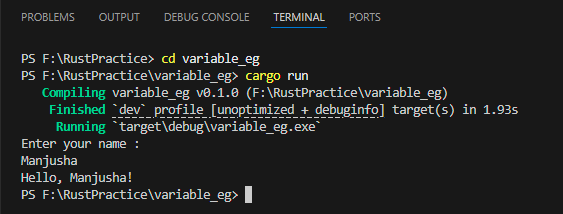
Click the image to view full size
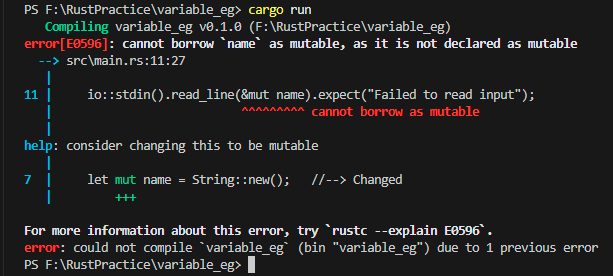
💡 Bonus: When You Forget mut — Rust Doesn’t Let It Slide
Rust is like that strict but helpful teacher — it won’t let you get away with even the smallest mistake. And that’s a good thing — it trains you to write cleaner, safer code from day one.
Let’s see what happens when we try to change a variable without declaring it mutable.
Screenshot : Oops! No mut
Click the image to view full size
Screenshot : Error from Terminal
Click the image to view full size
💡 Challenge:
Inside fn main(), declare a variable x with the value 5.
Then, increase x by 1 and print the result using println!.
⏳ Try writing this on your own before you look at the solution!
✅ Show Solution
fn main() {
    let mut x = 5;
    x = x + 1;
    println!("x is: {}", x);
}💻 Works best in desktop view
But what if you want to reuse the same variable name with a new value — or even a new type — without making it mutable?
That’s where Rust introduces a surprisingly powerful feature: Shadowing.
♻️ Shadowing in Rust: Reuse Without the Risk
Shadowing allows you to declare a new variable with the same name as a previous one, effectively replacing it — without using mut and without side effects.
It’s not about changing the original variable — it’s about creating a new version of it, step by step, in a safer and cleaner way.
Let’s break it down with a real example.
📁 Creating a new project for shadowing
cargo new shadowing_eg
cd shadowing_eg
This creates a new folder with a basic Rust project containing a main.rs file. We’ll edit this file to explore shadowing and user input.
Screenshot : A new Rust project for shadowing has been created.

Click the image to view full size
🔖 Keywords and Concepts used in this program
Here’s a quick breakdown of the key Rust elements used in this program:
| Line | Concept |
|---|---|
use std::io |
Importing the standard input module |
let mut x = String::new() |
Declaring a mutable string variable |
read_line() |
Reading input from terminal |
expect() |
Handling potential input errors |
trim() |
Removing newline from input string |
parse() |
Converts a string into a number (i32) |
println!() |
Printing formatted output using placeholders |
To use shadowing in Rust, simply reuse the variable name with a fresh let.
Example:
let x = 5;
let x = x + 10;  // x is now 15
You don’t need mut here — each let creates a new version of x, while keeping the code safe and easy to follow.
⁉️ Why mut is used in let mut x = String::new()
- Shadowing doesn’t require
mut. But in this case, we usemutbecause theread_line()function modifies thexvariable directly by inserting user input into it. - Once the input is captured, we no longer modify
x. Instead, we use shadowing to:
→ trim the string
→ convert it to a number
→ calculate the square.
Example Program: Square of a number!
This is a simple program that takes a number as input and prints a square of the number
Screenshot : Code for the shadowing example
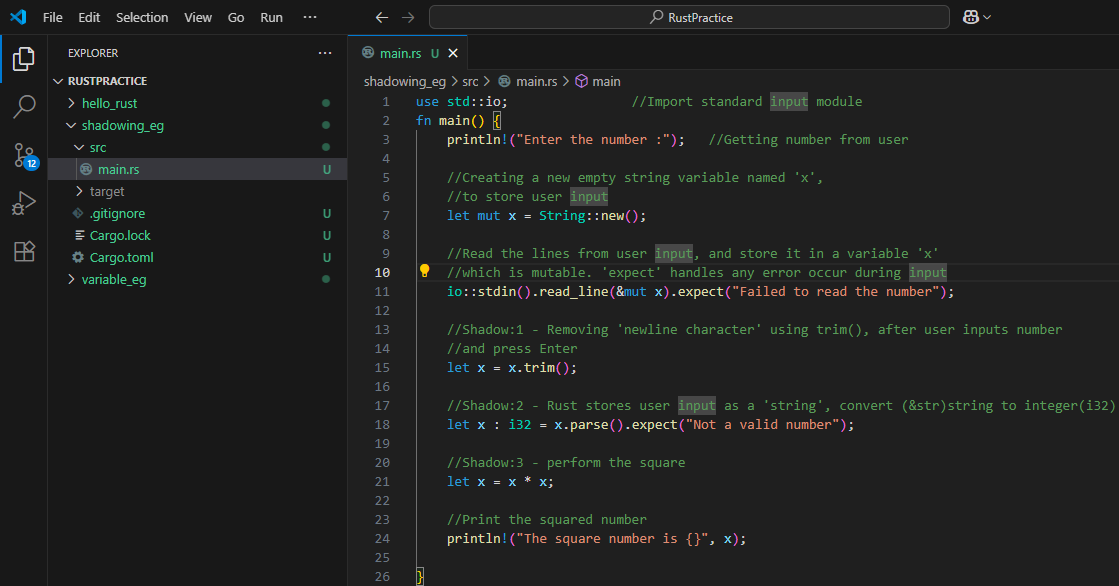
Click the image to view full size
Screenshot : Terminal output of the square
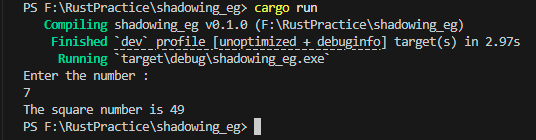
Click the image to view full size
💡 Challenge:
Inside fn main(), declare a variable x with value 10.
Then, use shadowing to double its value.
Finally, print the new value of x.
⏳ Try writing this on your own before you look at the solution!
✅ Show Solution
fn main() {
    let x = 10;
    let x = x * 2;
    println!("x is: {}", x);
}💻 Works best in desktop view
You’ve now learned how to declare, mutate, and even shadow variables the Rust way.
But what can those variables actually store? Numbers? Text? Collections?
In the next section, let’s decode the data types that power every Rust program.
🗃️ Mastering Rust’s Data Types: Why They Matter
Rust is a statically typed language — every variable has a data type, and that type is known at compile time.
In this section, we’ll explore two categories of data types:
- Scalar Types — single, simple values like numbers, booleans, and characters.
- Compound Types — collections like tuples and arrays that group multiple values.
And yes, this won’t be all theory — we’ll dive into two small, practical programs using real user input.
Setting Up the Project for Scalar Data Types
cargo new scalar_datatype_eg
cd scalar_datatype_eg
This creates a new folder with a basic Rust project containing a main.rs file. We’ll edit this file to explore scalar datatypes.
Screenshot : New Rust project scalar_datatype_eg created

Click the image to view full size
🔖 Keywords and Concepts used in these examples
Here’s a quick breakdown of the key Rust elements used in this program:
| Line | Concept |
|---|---|
let / mut |
Declaring variables (mutable or not) |
String::new() |
Creating an empty string to store input |
read_line() |
Reading user input from terminal |
trim() |
Removing extra characters like newline (\n) |
parse() |
Grouping values of different types |
tuple |
A group of different types in fixed order |
array |
Storing multiple values of the same type |
i32, bool, char |
Common scalar types used in Rust |
println!() |
Printing formatted output to the terminal |
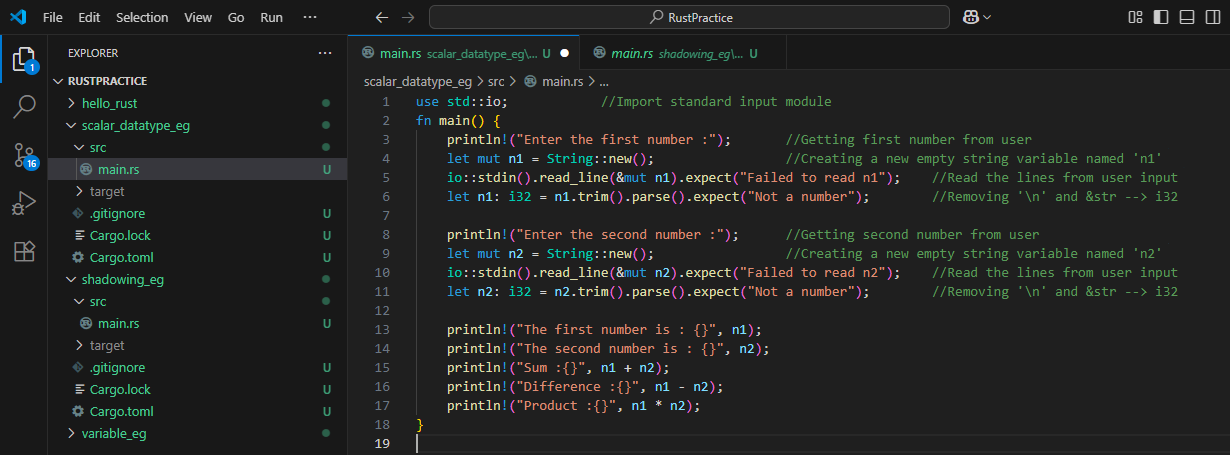
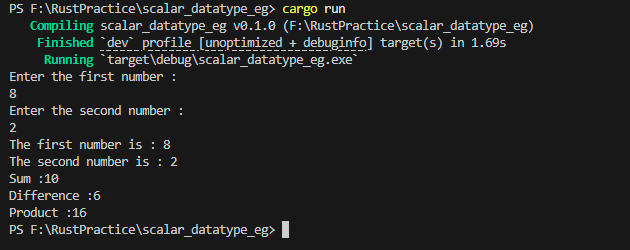
Example 1 – Scalar Types: Simple Calculator
This program takes two numbers as input and prints their:
- Sum
- Difference
- Product
Screenshot : Code for the scalar example
Click the image to view full size
Screenshot : Terminal output of the scalar example /Image scalar_output/
Click the image to view full size
💡 Challenge:
Inside fn main(), take two numbers (integers) as input from the user.
Then calculate and print their sum.
⏳ Hint: Use read_line, trim, parse, and let.
⏳ Try writing this on your own before you look at the solution!
✅ Show Solution
use std::io;

fn main() {
    let mut a = String::new();
    let mut b = String::new();

    println!("Enter first number:");
    io::stdin().read_line(&mut a).expect("Failed to read");
    println!("Enter second number:");
    io::stdin().read_line(&mut b).expect("Failed to read");

    let a: i32 = a.trim().parse().expect("Not a number");
    let b: i32 = b.trim().parse().expect("Not a number");

    let sum = a + b;
println!("Sum is: {}", sum); }💻 Works best in desktop view
Setting Up the Project for Compound Data Types
cargo new compound_datatype_eg
cd compound_datatype_eg
This creates a new folder with a basic Rust project containing a main.rs file. We’ll edit this file to explore compound datatypes.
Screenshot : New Rust project compound_datatype_eg created

Click the image to view full size
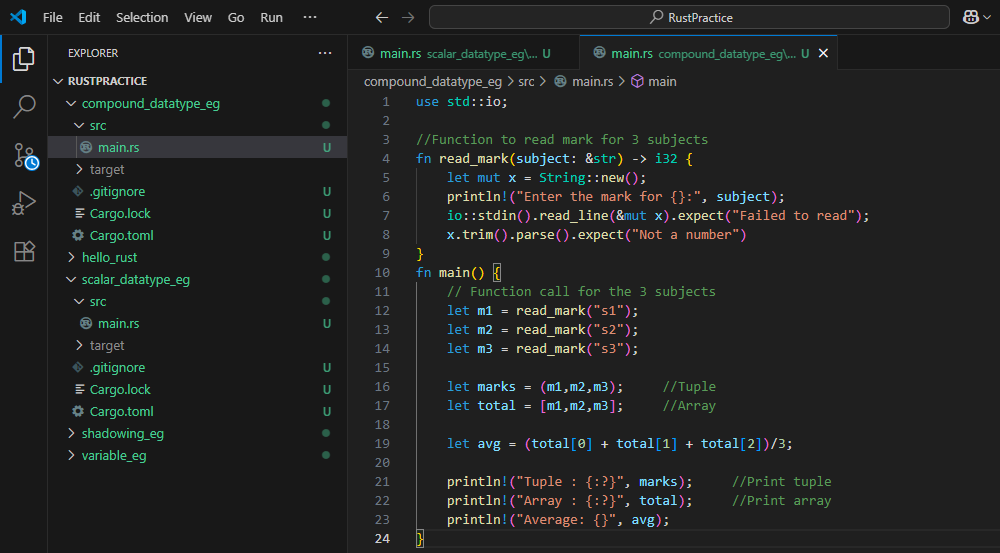
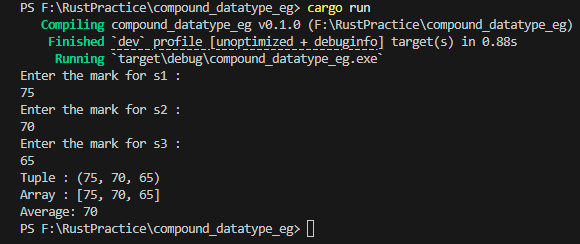
Example 2 – Compound Types: Tuple and Array Demo
This program takes marks in three subjects as input:
- Stores them in a tuple and an array
- Calculates the average
- Prints formatted data
Screenshot : Code for the compound example
Click the image to view full size
Screenshot : Terminal output of the compound example
Click the image to view full size
Tips & Reminders :
Basic types like
i32can be printed using{}, but for collections like arrays or tuples, you need{:?}(debug formatting).If the last line in a function has no semicolon, it returns that value.
If you add a semicolon, it becomes a statement — and won’t return anything.
You can import the
iomodule usinguse std::io;and then shorten input calls to justio::stdin().
💡 Challenge:
Create a tuple to store your name (as &str) and your age (as i32).
Then create an array of 3 numbers.
Print both using println!.
⏳ Hint: Use let person = ("Alice", 30); and let numbers = [1, 2, 3];
⏳ Try writing this on your own before you look at the solution!
✅ Show Solution
fn main() {
    let person = ("Alice", 30);
    let numbers = [1, 2, 3];

    println!("Name: {}, Age: {}", person.0, person.1);
println!("Numbers: {:?}", numbers);}💻 Works best in desktop view
🎯 Conclusion – What You’ve Learned So Far
You’ve now taken your first solid steps into Rust — and tackled some of its most essential building blocks:
- How to declare variables (with and without
mut) - The power of shadowing to transform values cleanly
- The difference between scalar and compound data types
- How to take user input — and how Rust’s strict typing helps prevent mistakes early on
You’ve seen how Rust strikes a balance between safety and control, while still being clear and expressive.
Give yourself credit — these concepts form the foundation of every Rust program.
🔜 Coming Up Next on 🚀Techn0tz
Control Flow and Functions in Rust – Power in Your Hands
In the next post, we’ll unlock one of Rust’s most powerful features: the ability to make decisions, loop through data, and write your own functions — all with precision and safety.
Stay tuned — your Rust code is about to get a whole lot smarter.