📃 Introduction
🛸Welcome back to Techn0tz! In the previous post, we covered how to set up Git, Ruby, Bundler, and Jekyll on Windows. Now, it’s time to take the next step—building and previewing your first Jekyll site locally.
- In this post, you will:
- Create a new Jekyll site from scratch.
- Understand the default folder structure of a Jekyll site.
- Build and serve your site locally, previewing changes in real time.
- Troubleshoot common issues.
- By the end of this guide, you will have a fully functional Jekyll site running on your local server, ready for further customization.
🎈Let’s get started!
🎯 Prerequisites
- Before we begin, make sure you have completed the following:
- Installed Git, Ruby, Bundler, and Jekyll on your Windows system. (If not, see Jekyll Series: Part1 - Jekyll setup on windows).
- Have a basic understanding of the Command Line Interface (CLI).
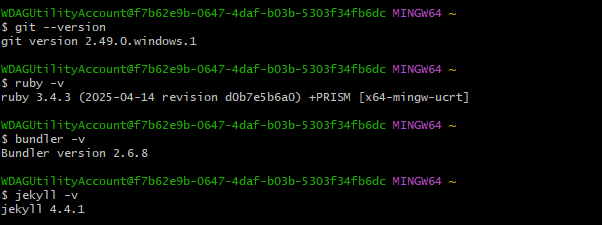
- The screenshot below confirms the versions of Git, Ruby, Bundler, and Jekyll installed on your system.
📝 Steps to Build Jekyll Site Locally
🌐 Step 1: Initialize Your Jekyll Site
jekyll new myblog- This command creates a new Jekyll site with all necessary files and folders pre-configured.jekyll new- creates a new Jekyll site.myblog- name of your site folder. You can replace myblog with any folder name.
- Screenshot - Running
jekyll new myblogcommand in Git Bash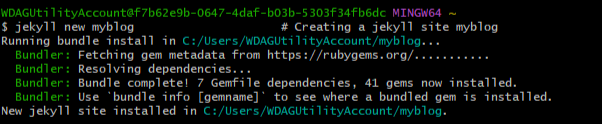
Note: This post uses the default Jekyll site setup without any custom themes or configurations. The default site already includes an example post (2025-05-12-welcome-to-jekyll.md).
🌐 Step 2: Navigate to the Directory
- Use
cd myblogto enter the newly created site directory.cdstands for change directory, this command moves to newly created foldermyblog.
Tip: Use
ls -Rcommand to view the complete jekyll folder structure.
- Screenshot - Running
cdandls -Rcommand in Git Bash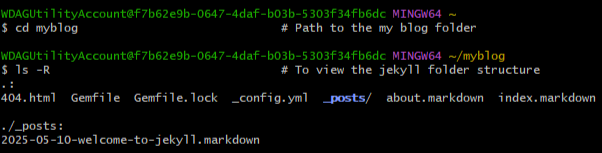
The directory structure is:
- _config.yml - Main configuration file for your Jekyll site.
- _posts/ - Directory for your blog posts (Markdown files).
- Gemfile - Lists dependencies (gems) for your site.
- Gemfile.lock - Auto-generated by Bundler (dependency lock).
- 404.html - Default “Page not found” template.
- about.markdown - Example “About Page”.
- index.markdown - Homepage of your site.
🌐 Step 3: Install Dependencies
- After navigating to your Jekyll site directory, install all the dependencies using Bundler.
bundle install- This command automatically reads the GemFile and install all the required plugins and supporting libraries for your Jekyll site.
- Screenshot - Running
bundle intallcommand in Git Bash
🌐 Step 4: Build and Serve Jekyll Site Locally
- Now all the dependencies are installed locally, the next step is to build and preview your Jekyll site locally on your system.
bundle exec jekyll serve- This command builds the site using the correct version of Jekyll specified for your Gemfile and starts a local development server (http://localhost:4000) by default.
- Screenshot - Running
bundle exec jekyll servecommand in Git Bash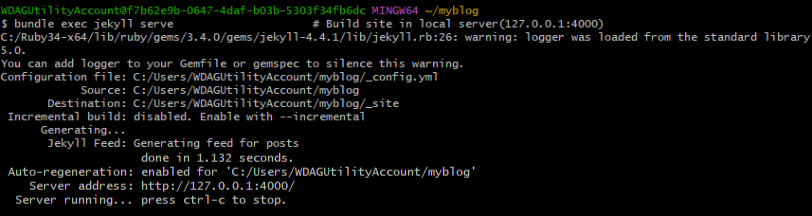
🔎 Accessing Local Jekyll Site
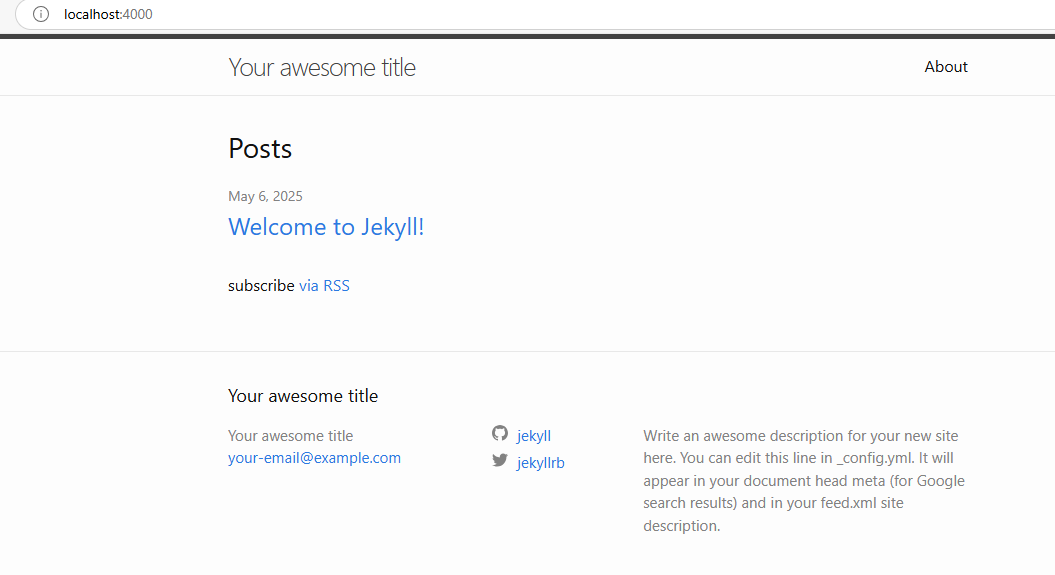
- Open your web browser.
- Go to http://localhost:4000 (or http://127.0.0.1:4000).
- You should see your default Jekyll site running.
🧭 Understanding How Changes Work
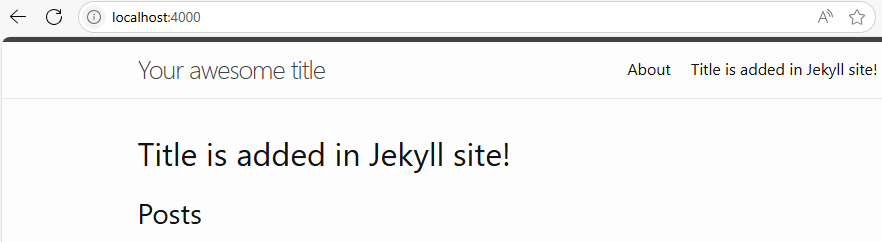
- Now that your Jekyll site is up and running, let’s see how it responds to changes. Jekyll automatically rebuilds the site when files are changed.
- Example: Modify the index.md file (change the title, as shown in the screenshot below).
-
Screenshot - Editing index.md file

- Immediately, the Jekyll terminal will display that the site has been rebuilt.
-
Screenshot - The terminal showing updated changes.

- Refresh your web browser (http://localhost:4000), and you will instantly see the updated site.
- Screenshot - Updated site preview
💡 Understanding Markdown files and Jekyll _posts Directory
- With your site running, it’s time to learn how to create content. Jekyll uses Markdown (.md) files to create and format blog posts.
- Markdown (.md) is a light-weight markup language that uses simple symbols to format text.
- Jekyll use Markdown files to create and format blog posts.
  # Heading 1
  ## Heading 2
  - Bullet list item
  **Bold Text**
  [Link Text](https://example.com)
📁 Jekyll’s _posts Directory
- This directory stores all your blog posts.
- Naming convention: YYYY-MM-DD-post-title.md (eg. 2025-05-12-welcome-to-jekyll.md).
-
Each post must begin with Front Matter (YAML format), which provides essential details about the post.
- Example for Front Matter:
layout: post title: "My First Blog Post" date: 2025-05-10 categories: Git - The layout: post specifies that this is a blog post.
- The title, date, and categories fields describe your post.
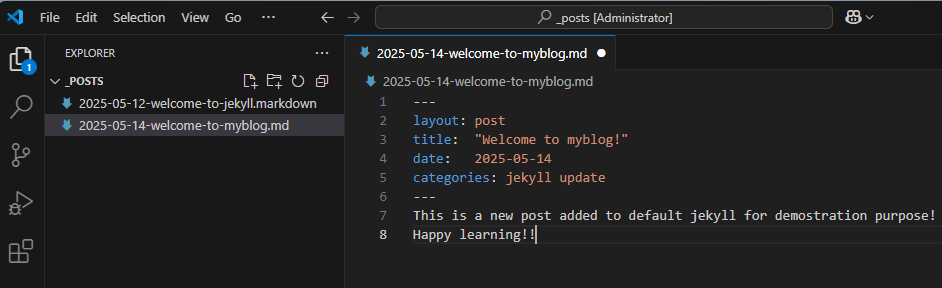
‼️ Creating Your First Blog Post using VS Code
- Open the _posts directory in VS Code (or your preferred text editor).
- Create a new .md file with the format: YYYY-MM-DD-post-title.md.
- Add front matter and content using markdown syntax.
- Write your post content below the Front Matter using Markdown.
- Save the file.
-
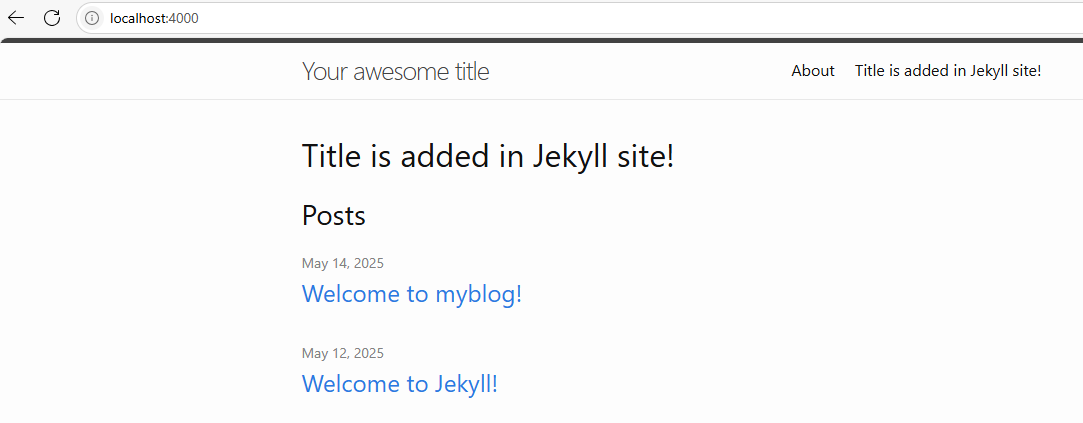
Refresh your local site (http://localhost:4000) to see your new post appear.
-
Screenshot - Creating a new post in VS Code.
-
Screenshot - Git Bash terminal showing site rebuild after adding the post.

- Screenshot - Jekyll site displaying the new post and its content.

💭 Troubleshooting Common Issues
| Issue | Cause | Solution |
|---|---|---|
Could not locate Gemfile or .bundle/ directory |
Not in site directory. | Ensure you are in your Jekyll site folder before running bundle install. |
Could not find webrick (Older Ruby versions) |
Missing dependency. | Run bundle add webrick and try again. |
| Site not showing changes | Browser cache or server not running. | Make sure the local server is running. Clear browser cache and refresh. |
Permission denied (Windows) |
Lack of admin rights. | Run Git Bash as Administrator. |
Address already in use error |
Port 4000 is occupied. | Use bundle exec jekyll serve --port 4001 to use a different port. |
| Markdown not rendering properly | Incorrect Markdown syntax. | Verify your Markdown file has the correct syntax and Front Matter format. |
| Post not displayed in local site | Post has a future date | Use --future flag to preview future posts: bundle exec jekyll serve --future. |
📜 Conclusion
- 🎉Congratulations! You have successfully:
- Built and served your first Jekyll site locally.
- Learned how Jekyll automatically updates your site with changes.
- Understood Markdown syntax and the _posts directory.
- Created your first blog post using Markdown.
🧠 Technuggetz - Did you Know?
⚡Instant update with Live Reload - Use
bundle exec jekyll serve --livereloadfor automatic page reloads in your browser whenever you make changes.⚡The
bundlecommand used to manage your project’s dependencies defined in the Gemfile, while Bundler is the Ruby gem (package) that provides thebundlecommand. Use them appropriately!⚡Quickly create a post - Run
bundle exec jekyll post "Your New Post Title"to instantly generate a new postin your _posts directory.
In the next post, you will learn how to push your Jekyll site to GitHub Pages and make it accessible online.
Stay tuned to 🚀Techn0tz!! for the next step in your Jekyll journey.